Handwriting is a skill that has many benefits. It helps young children interact intimately with the language. For adults, it can be a calm and contemplative experience. Getting good at handwriting is a worthwhile effort for everyone. In this article, we will introduce our essential methods to improve your handwriting.
The essential methods to improve handwriting is broken up into 5 major parts:
- Preparing to write by hand
- Training to write by hand
- Handwriting on-the-go (as you write)
- Handwriting analysis and correction
- Practice makes perfect
These 5 major parts are essential for improving your handwriting. You should follow each part according to the above sequence.
Beginning in part 1, we will touch on the things to prepare before starting to write by hand. In part 2, we will explain the training exercises that you can use to improve your handwriting. In part 3, you will learn about the handwriting details to take note of while you write. Completing these 3 parts, you will have learned how to write well by hand.
After learning to write well by hand, part 4 will be focused on helping you to improve your handwriting further. You will learn about analyzing your handwriting to make future correction and improvements.
Lastly, we will explain about being motivated and how to set realistic expectation for your handwriting practice in part 5. This is arguably the most important part of the essential methods to improve handwriting. Here, you will learn advices to bring about consistent effort that will produce improvements for your handwriting.
Read on to learn and apply the essential methods to improve your handwriting.
Part 1: Preparing To Write By Hand
There are many things to be aware of when beginning your handwriting practice. Knowing them can help you get the most out of your handwriting practice faster. They are especially important if you are going to guide young children on handwriting. It will help them to build up a good handwriting foundation and habits.
In this part on preparation, we will cover everything you need to prepare for before you start handwriting. The obvious will be your choice of writing tool(s) and positioning your body properly. Some less obvious things to take note of is your hand grip and other writing apparatus that can help build good handwriting habit.
Select Your Writing Tool
In this section, you will want to decide on your writing tool. Will it be a pen or pencil?
When deciding between a pen or pencil, you will need to consider your handwriting ability. Are you able to control your handwriting muscles with great ease? If so, then you might consider using a pen. If not, you might consider using a pencil.
As a general rule of thumb, for most adults, your handwriting muscles would be well-developed, and you will want to use a pen to write more fluidly. But there is no harm in using a pencil to write, as well. Using a pencil to write can help you to further refine your handwriting technique.
The main advantage of using a pencil is the greater handwriting control it offers. The increased handwriting control comes from its less fluid and higher friction movements on the paper. You will need to exert more force against the paper, as writing with a pencil will generate more friction at its tip. This added effort will help to slow down your handwriting.
Slowing down your handwriting can provide you with the time to be attentive to your handwriting technique. That is why most young children that start out handwriting always begin with the pencil. If you are reading this article to guide your young child with handwriting, we will suggest you let your child write with the pencil first.
Below we have summarized into a table of the benefits and downsides of using a pen or pencil.
| Pen | Pencil | |
| Key Feature | Low friction against paper | High friction against paper |
| Benefit | Smooth to write with. Good for writing fast. | Rough to write with. Easy to control. Good starting writing tool for young child. |
| Disadvantages | Lowers control Requires a certain level of handwriting skill to use well. | Bad for writing fast. |
Decide On Your Hand Grip
There are 4 types of hand grips variations for handwriting. All the types of hand grips use the thumb, index finger and middle finger. As for the ring finger, some of the hand grip uses it to support the writing tool. While other hand grips use the middle finger to support the writing tool.
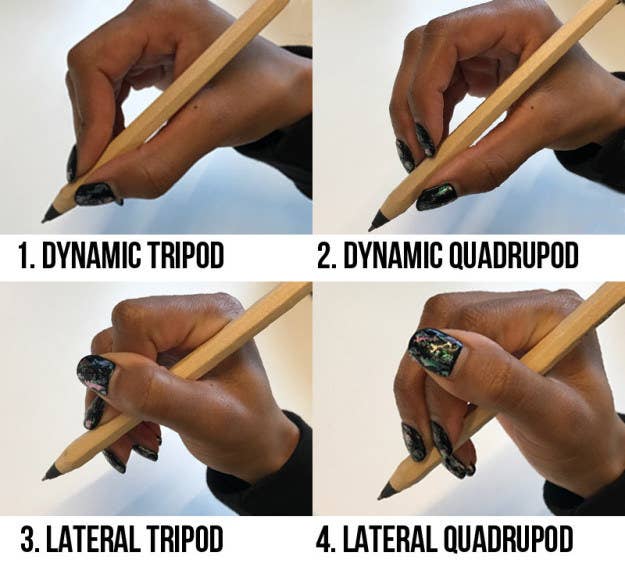
4 Types of hand grips variation.
Source: https://img.buzzfeed.com/buzzfeed-static/static/2017-04/12/16/asset/buzzfeed-prod-fastlane-02/sub-buzz-15016-1492028462-1.jpg
When selecting your ideal hand grip from the 4 types, it is important to bear in mind that there is no perfect or correct hand grip. You will have to try out each of the 4 types to find the hand grip that is most comfortable for you. This hand grip decision process will require you to make minor adjust to your hand grip to suit your comfort level.
If you are unsure about which hand grip gives you the most comfort, it is okay to switch your hand grip around each time till you find one that feels right. The key point here is to experiment with different hand grip and adjust until you find utmost comfort.
For adults, if you have been using a specific hand grip since young, and you find that a different hand grip feels more comfortable now, it is alright to make a change. However, when changing your hand grip in adulthood, you will initially feel that writing nicely with a new hand grip is difficult. This difficulty will subside as you practice writing more with your new hand grip. Similar to any habit, handwriting with your new hand grip will become an ingrained habit overtime.
A tip when deciding to switch hand grip is to practice writing with your new hand grip occasionally, while using your old hand grip for day to day writing tasks.
Relax Your Hand Grip
When writing, it is important to keep your hand grip relaxed. This is to prevent your hand from getting injured and reduces fatigue. It will allow you to write longer and free of pain.
Writing with a relaxed hand grip is an important part of improving handwriting. As you will learn in this guide, improving handwriting is not only about the writing of letters onto a piece of paper. Handwriting improvement is also about the quality and endurance of your ability to write, and that will be contributed by factors, such as your hand grip tightness.
Before you learn about relaxing your hand grip, you need to understand the bad effects of a tight hand grip.
Overly tight hand grip will cause a strain on your forearm. This is because the hand grip of your writing tool is controlled by the forearm muscles. When your hand grip is tight, your forearm will quickly feel the aches. Then, you will not be able to write longer. If things were to exacerbate, you might find yourself requiring medical attention for your muscle strain.
To avoid having a tight hand grip, you should only use an appropriate amount of force on your hand grip. As a general guide, you should feel that your hand grip is tight enough to keep your writing tool firmly in your hand. That means your writing tool is not wobbly.
If you follow the advice to relax your hand grip, you forearm should not feel tensed up. You will be able to increase your handwriting endurance without getting injured.
In the next topic, we will follow up on handwriting endurance and injury avoidance by explaining the proper use of muscle groups for handwriting.
Use The Correct Muscle Groups
It is common for many people to rely on forming letters by their wrist. This is controlled by the forearm muscles. Like the hand grip, this will add strain to the forearm overtime.
Instead of using the forearm with a small muscle group, it is better to rely on a larger muscle group. It might be a surprise to many, this larger muscle group controls the shoulder girdle. That means you can use these larger muscle group to move your entire arm.
Handwriting with your larger muscle group around the shoulder girdle can improve your handwriting endurance. You will feel less fatigue when writing with this muscle group.
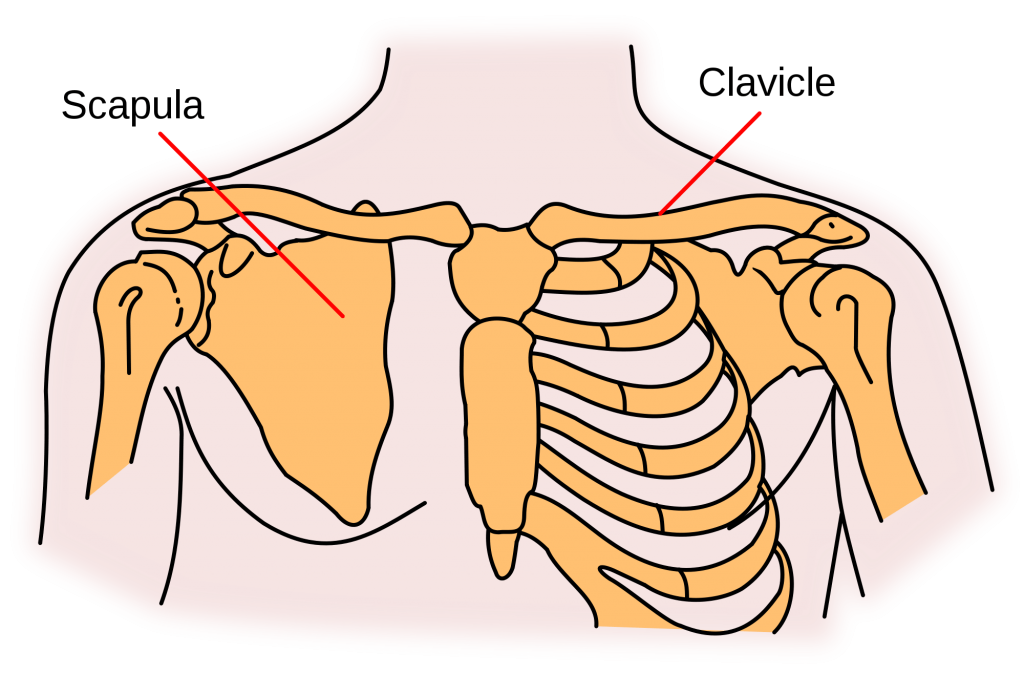
The bones (Scapula & Clavicle) that connects to the arm form the shoulder girdle.
If you have not been handwriting with the use of your muscle group around the shoulder girdle, worry not! Later in the guide, there will be a section on improving with a practice exercise, which you can do to start engaging its use in your handwriting.
Use A Slanted Board
Do you realize that you will hunch forward when handwriting on a flat table? This is a common sight of many people writing by hand on a flat table. On a flat table, the head has to tilt forward to get the paper within visual sight. Following the head tilt, it is natural that the body tends to hunch forward to avoid an excessive head tilt.
The effect of writing on a flat table becomes the start of most people acquiring a bad posture when sitting down. Since we begin learning to write at a young age, the bad posture is further solidified during our developmental years. Avoiding this bad posture from a young age is important. Similarly, it is also not good to continue with the bad posture as adults.
From ages ago, our ancestors have developed a solution to the bad posture caused by handwriting. The solution is a simple angled table, which was commonplace in school desks of the past. However, it has changed in our modern times, where the flat table is more common.

Angled school desks.
The most likely reason why the angled table is out of fashion currently is its impracticality. A flat table is more practical for daily use. We can place our stuffs on it without fear of them falling off the table.
While so, the benefit of using an angled table cannot be ignored. An angled table helps to elevate the paper. This makes the paper easier to be seen and places less strain on our eyes. It also encourages our writing hand to be placed on it with less force. Having less force on our writing hand will make our writing smoother.
With so many benefits, it will be a waste to not write on an angled table. Luckily, there is a modern alternative to the angled table. The modern alternative is a slanted board. This simple board is portable and can be placed atop any flat table. It can provide the same posture correcting effect as a dedicated angled table.
Cost wise, the slanted board is cheaper than a dedicated angled table. Thus, it is a popular option for people of all ages to use when handwriting.
Posture Rightly
Before starting to write by hand, it is crucial you get your posture right. You will want to get it right and avoid any discomfort while writing. Additionally, this will help you to prevent bodily injury and aches from bad posture. A good posture will aid in better handwriting as well.
For your body posture, keep your legs planted on the ground firmly when seated. Your torso should be kept upright.
For your writing arm, lean slightly on it. Take care not to place too much weight your writing arm. Importantly, your writing arm should still be free to move around.
The reason to lean on your writing arm is to allow it to rest on the table. You would not want to tire yourself by raising your arm while writing.
Your non-writing arm will be used for holding down and moving the paper. As such, do not lean on this arm. You might consider resting it on the table while it holds down the paper.
Part 2: Training To Write By Hand
In part 2, I will begin to introduce the training and ideas you can do to improve your handwriting. Each training and each advice are focused on a particular aspect of handwriting. When you use all of part 2 training and ideas in combination, you will get the most out of your handwriting training.
Briefly, the training methods will begin from a heavy emphasis on handwriting muscular control. It will be followed by the focus on writing letters.
Throughout part 2, you will read about handwriting tips to make your handwriting training and practice session more effective.
Write In The Air
It is time to write in the air. This training exercise will help you to engage your entire arm, especially the muscle group around the shoulder girdle. It will get you working with the correct muscle groups when handwriting. For a young child with no handwriting experience, this is definitely the best exercise to use to introduce handwriting to the young child.
The goal of writing in the air is to form the letter shapes in the air. Using your finger, you will gesture with the use of your arm, remember to engage the muscle group around the shoulder girdle, to form the letter shapes. Progressively, if you want a more challenging experience, start to write a word then a sentence in the air.
By practicing writing in the air daily, it can help you to not only engage the correct muscle groups. Additionally, you will start to broaden your handwritten letters, as a result of learning to engage the bigger muscle groups. That means, your improved handwriting will be less cramped and more legible.
Simply Doodle
Doodling, the act of random drawing, is a great way to become use to your writing tool. During the exercise, your aim is to put into practice the good habits learned thus far on holding and controlling your writing tool.
The aim of the doodling exercise is also to improve your muscular control of your writing tool. In the above exercise, “Write In The Air”, you practiced using the muscle groups for handwriting without your writing tool. This doodling exercise is to get you to wield and effectively control your writing tool. That means, your muscles involved in handwriting will be trained to be more refined in smaller movements compared to the previous exercise, where your muscular actions are exaggerated.
As you doodle and become familiarized with your writing tool, you are building up the muscular sensation of moving your writing tool. If you have been handwriting for many years, do not skip this exercise, it still has its benefits. From doodling, you can better internalize the use of your writing tool, especially if it is a new writing tool. This can help you to better form your shapes while handwriting.
Here are some advices for the doodling exercise:
When you doodle, you will want to practice drawing whatever comes to mind. Do not put much thought into your doodle or overthink your doodle. It should be relaxing and without much stress.
If you are having difficulty with deciding on what to doodle, you can find some simple shapes or drawings to copy. Try adding your own touch and flavor to the shapes or drawings you copy. Another idea for doodling is to draw whatever items are in your surroundings.
As you doodle, remember to engage the muscle groups you trained in the “Write In The Air” exercise. You will want to continue the learned good habit of using the correct muscle groups for handwriting, as you continue in this exercise and other exercises below.
If you are starting a young child on using a writing tool, such as a pencil, doodling is an effective approach for them to familiarize with the use of the writing tool. Also, it is fun to doodle. This helps to keep the young child interested and motivated in using the writing tool.
On a side note, doodling can also help to spur creativity.
Have you felt bored at times? Doodling can help you to displace your boredom. So, use the doodling exercise to help you improve your handwriting and avoid those boring times.
As we like to say – “Simply Doodle!”
Practice Basic Shapes And Lines
After the above exercises, you would have strengthened your handwriting muscle groups. Now, you are ready to dive deeper into the mechanics of forming letters. This is the main goal of practicing basic shapes and lines. Also, this practice provides more opportunity to work on those handwriting muscle groups.
With the practice of basic shapes and lines, you will be focusing on the details of a letter. A letter, as you know, is make up of shapes and lines. In this practice, the letters are broken into their basic shapes and lines. This gives you a more focused and simplified practice to work on.
The practice of basic shapes and lines removes the complexity of letters. That way, you can focus single-mindedly on getting the parts of a letter drawn well.
It is a good habit to practice with basic shapes and lines before handwriting. The exercise serves as a great way to warm-up your handwriting muscles. As an advice, start each handwriting practice with this warm-up exercise.
The basic shapes and lines to practice:

Shapes and lines for practice.
Here are some advices when practicing basic shapes and lines:
When you begin drawing the basic shapes and lines, keep your drawing larger than your usual handwritten letter size. By drawing larger, you can re-enforce your correct use of muscle groups, and it helps to improve your handwriting control.
Throughout the exercise, you should place your attention on forming the shapes and lines as best as you can. This means that you should keep the lines you drew as straight as possible. For rounded shapes, try to form smoothened roundness.
Learn From A Directional Guide
This is an advice if you want to optimize your handwriting of letters. You can learn from a directional guide of letters to find the most effective sequence and direction of letter formation.

Letter directional guide.
Source: https://practicalpages.files.wordpress.com/2009/11/print-lower-case-with-arrows.jpg
Remember that a directional guide is just a guide. Take it as a guideline of the best practice. If you find that you feel more comfortable and/or effective forming letters in a particular sequence and direction, it is alright to follow your preference. Do not force yourself to conform to the guide if it makes your handwriting experience feels not natural.
On the other hand, a directional guide of letters is extremely useful as a starting point for a young child to learn when handwriting of letters. It provides the young child with a basic idea of what to follow to form letters. Additionally, the directional guide gives a sequential process that makes the letter formation easier for the young child to replicate.
Shift The Paper Around
When you write on paper, you should consider the position of the paper. You do not have to keep the paper straight in-front of you when handwriting. It is unnatural to write with your hand parallel to the paper. You should shift the paper around to suit you.
Depending on your writing hand, left-handed or right-handed, you might consider shifting the paper at an angle away from your writing hand. In the case of a right-handed person, you might want to shift the paper at an angle towards your left. As you shift your paper, experiment at different angles for the most comfortable paper position.
An added benefit of shifting your paper away from your writing hand is improve neatness in your handwriting. By positioning the paper at an angle away from your writing hand, you might find it easier to guide your handwriting in a straight line.
Finding the ideal paper position will take a few trials. Once you find the ideal paper position, it will make handwriting so much more comfortable.
Write On Lined Or Boxed Paper
Another handy advice to improve your handwriting practice is to write on either a lined or boxed guided paper. The lines and box grids can provide a reference point for your handwriting. It will help you to keep your handwriting within a consistent size.
Using the boxed guided paper can provide an additional guide for the width of your handwriting. This is especially useful as a guide to keep your handwritten letters’ width consistent.
Both lined or boxed guided paper can provide the visual cue for keeping your handwriting in a straight line.
Write Big Before Going Small
Writing big before going small is an effective exercise to refine your handwriting and train the use of proper handwriting muscle groups. You can start your handwriting practice by writing letters, words, or sentences in a big size. This can be up to 3 lined space on a lined guided paper.
As explained above, writing with the larger muscle groups around the shoulder girdle helps extend your handwriting endurance. In this exercise, the practice of writing big helps to re-enforce the use of proper muscle groups. This exercise repeats the same idea as “Write In The Air” exercise. While the exercise brings into practice the use with a writing tool.
You can add this exercise into the above training of “Simply Doodle” and “Practice Basic Shapes And Lines”. Also, together the combination of exercises can be a great warm-up before handwriting.
As you write big, remember to write smaller as you practice more. When writing smaller, remember to keep the larger muscle groups engaged.
Keep at it and write big then small to refine your handwriting. You should aim for greater consistency, control and clearly formed shapes from your handwriting refinement.
Practice With A Workbook
With so many advices and training exercises to consider, it can be overwhelming to remember them all. This is where a handwriting workbook can provide the guided practice session. A well-developed handwriting workbook will contain all the above practice ideas.
Good news! We have developed such a handwriting workbook, which you can download below for free. All we ask from you is your kind feedback after using the handwriting workbook. It will help us improve the handwriting workbook for you and others. Or drop us a simple email of your improved handwriting picture. This will help us know our handwriting workbook has helped you achieved better handwriting.
(Downloadable book coming soon December 2019, join our newsletter to receive update when its available.)
By sign up for the free handwriting workbook, you will receive a download link of the handwriting workbook. Also, the email collected will make it possible for us to email you with newer version of the free handwriting workbook when available.
Find The Time To Practice
One last thing on handwriting practice. You need to find the time to practice your handwriting. Your handwriting will not improve until you practice it often.
You can set a weekly schedule to practice your handwriting. Setting weekly schedule can help you build handwriting practice into a routine and long-term habit.
If you find it difficult to schedule a specific time weekly for handwriting practice, fret not. Another way is to find free time in your day and do some quick handwriting practice. Or use your handwriting practice as a warm-up exercise before a writing assignment. It can be a good way to stimulate your mind, and slot in that quick handwriting practice.
Part 3: Handwriting On-The-Go (As You Write)
In this part of essential methods to improve handwriting, you will learn the key elements to pay attention when handwriting. It is important to become aware of these elements so that you can improve your handwriting. This is similar to any process of learning a skill, you need to focus your mental effort on each key handwriting steps as you write. By doing so, you will be able to correct and improve or maintain the practice of good handwriting techniques. Also, these are elements of handwriting that you can adjust as you are handwriting to improve your handwriting a little more each time you practice.
As you write, pay attention to these elements of handwriting:
- Handwriting clarity
- Hand grip
- Writing speed
1. Focus On Handwriting Clarity
The main purpose of handwriting is to communicate your thoughts onto paper. To effectively communicate your thoughts by handwriting, you need to write the letters clearly. That means forming each letter shape properly, such that someone reading your handwritten letters are able to recognize the letters without much effort.
The next level of handwriting is at the words stage. When writing words within a sentence, you should give adequate spacing between words. If your spacing between words is too narrow, it will make reading the sentence difficult. Similar to forming letters, you would want someone reading your sentence to be able to identify each word clearly, as each word is given enough spacing.
While you are writing, pay attention to the above pointers. Self-correct any handwriting that is not clear to read.
2. Adjust Your Hand Grip
As you have read Part 1 on “hand grip”, the goal of your hand grip is important for comfort and handwriting endurance. You can adjust the tension on your hand grip as you write. Remember that your hand grip should be tight enough to hold onto your writing tool firmly.
The usual tendency of most people is to tense up their hand grip the longer they write. You might need to remind yourself to relax your hand grip when writing for longer duration.
3. Vary Your Writing Speed
Varying your writing speed is a good way to improve your handwriting quality and control. By slowing down your handwriting, you can take the time to write out each letter’s shape clearly. It is also fun to try speeding up your handwriting, as part of an exercise of control.
When you try handwriting fast and slow at different times, it can help stimulate more muscular memory for handwriting. This can happen as the varying of writing speed provides a more challenging handwriting experience, which will help you to internalize the skill better.
Part 4: Handwriting Analysis & Correction
In this part, you will learn to analyze your handwriting in greater depth than in part three. With greater analysis of your handwriting, you will be able to find areas for improvement. Making the correction on these areas for improvement will improve your handwriting.
Analyze Your Handwriting
When analyzing your handwriting, you will want to achieve these three goals:
- Clarity – This means the written words are easy to read.
- Uniformity – This means keeping the letter shapes and spacing between words consistent throughout your handwriting.
- Looks good – This means that your handwriting is beautiful to read.
I will recommend that you take a top-down approach to analyze your handwriting. That means beginning your handwriting analysis from the sentence level then the word level and ending at the letter level.
Work from “Sentence> Word> Letter”.
Remember to keep in mind the three goals mentioned above when analyzing your handwriting at each level.
At the sentence level, you will want to ensure each word is well-spaced apart for clarity. A neat trick is to imagine that between each word, you are able to fit the letter “O” in-between them. If the words are too close together, it will reduce the clarity of your handwriting, as they are cramped and difficult to read.
Also, at the sentence level you will want to ensure your handwritten words are of a consistent size. This will keep your handwritten sentence uniform and looking good.
At the word level, you will want to consider the slant and alignment of your letters. Avoid slanting your letters too far to either left or right, as it can make your handwriting less clear and difficult to read. Some people would prefer to slant their letters, as it helps them to write more comfortably. In this case, keep the slant not too extreme. As always, it is important to maintain uniformity with your handwriting, if you are slanting your letters, you should strive to keep the slant uniform.
In your handwritten word, observe if your handwriting is towards an upwards or downwards angle. This is known as alignment. The important thing here is to maintain a consistent alignment of your handwritten letters throughout your handwriting. Analyzing a word would provide hints if you are not keeping your handwriting aligned uniformly.
Finally, you will analyze your handwritten letters. The level of analyzing your handwritten letters is arguably the most important component to an improved handwriting. This goes back to all the training you have done above to build up your letter handwriting ability.
When you analyze your letters, you will want to observe the following – key shapes, quality of letter shapes and line quality. As discussed, letters are formed by key shapes of lines, loops and curves. You will want to ensure each letter shapes are formed well. That means they are clear to read.
The line quality of a letter is a result of the pressure you applied to your writing tool when handwriting. You will want to find areas of your handwritten letters with faint lines that are difficult to see, or of inconsistent line thickness. If you spot these issues, you will want to adjust your pressure applied while handwriting to get the letters formed clearly and consistently.
As you analyze your handwriting, take notes of the areas where your handwriting fails to meet the three goals of good handwriting.
Correct Your Handwriting
After analyzing your handwriting with the above guidelines, it is time you start to correct the imperfections. Correct the mistakes you have noted.
When correcting your handwriting, you will want to work from a bottom-up manner. That means, you will start to correct your mistakes from the level of letters followed by words then sentence. Correct the flaws in your letters formation before proceeding to improve on your words.
It is important to not overwhelm yourself by trying to improve too quickly. Always work on one element of handwriting at any point of time. This will prevent your handwriting improvement effort from becoming too diffused. Additionally, you will be able to observe the substantial improvement much more quickly by working on one element, which can help to keep you motivated to improve handwriting, as you see progress.
Part 5: Practice Makes Perfect
This part of the essential methods to improve handwriting will focus on the last piece of the puzzle to get good at handwriting. This final piece is to practice making your handwriting as perfect as you want. To many, this idea might sound simple, but it is definitely the part that most people will struggle with in their goal to improve handwriting.
It is common that you will feel fired up after reading this guide on handwriting. However, this enthusiasm will eventually simmer down. Therefore, it is equally important to not only learn about the methods to improve your handwriting technically, but also to set the mental framework to get you through your handwriting improvement journey.
To complete this essential guide, below you will find the tricks, tools and ideas to keep you going in your handwriting practice.
Finding Motivation
Before starting your handwriting practice, you need to understand the reason you are looking to improve your handwriting. There must be a reason that led you to read this guide on handwriting.
- Are you looking to improve your handwriting for personal satisfaction?
- Are you trying to get good a skill, and you decided that handwriting is a basic skill to improve?
- Are you trying to improve your handwriting so you can be a better artist and craft beautiful typefaces?
By knowing your reason for improving your handwriting, you can determine how motivated you are. You will also need to decide if your reason for improving is compelling enough, are there possible additional reasons that contribute to your motivation for improving your handwriting?
So, search for your motivations. When you have your motivations, it is good to write them down. Writing them down can provide something for you to refer, remind and re-enforce your motivation as you need.
Get Inspired
A great way to stay motivated, is to find a goal to strive for in your handwriting practice. As handwriting is skill used to produce beautiful artform, such as calligraphy, you can find some videos of professional calligrapher to watch to get inspired.
Another way to keep yourself inspired is to make a scrapbook of beautiful handwritten texts you found. The scrapbook of beautiful handwritten texts can become the handwriting beauty you strive to achieve. Before you begin your handwriting practice, looking through your inspirational scrapbook can help set the motivation.
Write By Hand Whenever Possible
It can be easy to become occupied with day to day activities and events that we forget our interest and goals. Your handwriting goal can also become a neglected interest or goal.
Luckily, handwriting is a skill that you can practice within many contexts. If you are a student, you can write your notes by hand. If you are working in a job, you might need to record down a memo, you can do that by hand instead of typing on a computer.
It’s time you sneak in your handwriting practice into every aspects of your life. Find and write by hand whenever possible!
Start Journaling
Nothing beats the daily effort to improve. Having a handwritten journaling routine can keep you on track in practicing daily. Nevertheless, daily journaling is a good habit to do. It can make you more reflective and self-conscious of your days and life. That means you will be more aware, and you can better steer your life towards the goals you hold dearest.
Conclusion
You have reached the end of this guide on essential methods to improve handwriting. As you can tell, handwriting is a skill that has many subtleties to it. Nonetheless, it is important to practice systematically one element of handwriting at a time. Before, you start practicing handwriting set your expectations realistically, as it will definitely take time to improve your handwriting.
Related Questions
How long does it take to improve my handwriting? Handwriting is a skill. It takes time to improve any skill. Therefore, the duration required for improvement will vary based on individuals and their handwriting objective. If you are trying to write neater and more consistent, you can expect to see improvement after about a month of consistent practice.
Quick Bits Of Handwriting
5 Tips To Improve Handwriting For Adults


Great tips on writing and parenting.